


A while back, my Mom and I spent an afternoon in the city and stopped for tea at Dr. Bombay's Underwater Tea Party, one of my favorite tea shops in Atlanta. With bookshelves overflowing with donated books lining the walls, umbrellas hanging from the ceiling, and an eclectic collection of photos and art spread throughout, it feels a little bit like walking into a scene from Alice and Wonderland. While I've spent time at Dr. Bombay's in the past, I'd never had afternoon tea there.


To raise the awesome factor even more, Dr. Bombay's is also the home of The Learning Tea, a not-for-profit that provides education for young women in India. Every month, Dr. Bombay's hosts A Taste of India dinner, and all the profits from the event support The Learning Tea. When I went to the monthly dinner in January, the shop was packed out. It was so encouraging to see the community there supporting such an inspiring cause!


Infused Marshmallows
adapted from thefoodnetwork.com
Total time: 4 hours 45 minutes
Yield: about 4 dozen large marshmallows
Tools
hand mixer
flat pan or container (for larger marshmallows, use a smaller, deeper dish. For mini marshmallows, use a large pan or baking sheet. I used two small tupperware containers)
Ingredients
3 packages unflavored gelatin
1 cup tea or coffee
1 1/2 cups granulated sugar
1 cup light corn syrup
1/4 teaspoon salt
1 teaspoon vanilla extract
1/4 cup confectioners' sugar
1/4 cup cornstarch
nonstick spray
1. Combine confectioners' sugar and cornstarch in a small bowl. Lightly spray pan or container with nonstick cooking spray. Add the sugar and cornstarch mixture and move around to completely coat the inside of the container. Return remaining mixture to the bowl for future use.
2. Combine gelatin and 1/2 cup of the chosen tea or coffee in medium sized bowl.
3. In a small saucepan combine the remaining 1/2 cup of liquid, sugar, corn syrup and salt. Place over medium high heat, cover and allow to cook for 3 to 4 minutes. Uncover and continue to cook until the mixture reaches 240 degrees F, about 7 to 8 minutes. Once the mixture reaches this temperature, immediately remove from heat.
4. Combine sugar mixture with the gelatin mixture and, using a hand or stand mixer, whip on low until incorporated. Continue to whip on high until the mixture becomes very thick and is lukewarm, approximately 8 to 12 minutes. Add the vanilla during the last minute of whipping. (I completely forgot to add the vanilla and it turned out fine!)
5. When ready, pour the mixture into the prepared container, using a lightly oiled spatula for spreading evenly into the pan. Dust the top with enough of the remaining sugar and cornstarch mixture to lightly cover. Allow the marshmallows to sit uncovered for at least 4 hours and up to overnight.
6. Once the marshmallow has set, flip the container over onto a cutting board. I had to slide a knife around the edge of the marshmallow before it finally popped out. Using a knife dusted with the confectioners' sugar mixture, cut into 1-inch squares (or into shapes or whatever size you like). Once cut, lightly dust all sides of each marshmallow with the remaining mixture. Store in an airtight container for up to 3 weeks.
Enjoy!
Steph
Over the summer, tea time often looked like this:

I discovered cold brewed tea and had a fun time experimenting with different types of tea and infusions. The benefit of cold brewing is that, rather than quickly forcing the flavor out of the tea leaves like hot brewing does, the cool water slowly pulls the flavor out. This brings out different aspects of the tea and can change the flavor.

I tried cold brewing a few different types of tea, some with added ingredients, some by themselves. The first combination I tried was black tea infused with peaches. After mixing them together, I left the mixture to brew for about eight hours. Any longer than that and it began to get a bitter tinge to it. I was a little disappointed with this one because the peach taste was barely discernible at all. Overall, though, I really liked the different taste that cold brewing brought out in the black tea. It's much softer and sweeter than when hot brewed.

Next i tried an oolong tea. Didn't end up drinking this one...the dried fruit in the tea made it look murky and unappetizing. I'll have to try again with a plain oolong sometime!


My favorite of all of the infusions was definitely the rooibos with mint. Because the rooibos doesn’t get bitter if left too long, I left it for a day which allowed the mint to come out alot stronger. Plus, the color of the tea is an awesome deep red which I always love. Interesting fact: A huge amount of rooibos tea is grown in South Africa and 'rooi bos' means 'red bush' in Afrikaans.


Have you ever tried cold brewing tea? What was your favorite?
Thanks for reading!
- Steph
A few weeks ago, I found a Scoutmob deal for Zen Tea, a local Atlanta tea shop. I'd heard a lot about the shop so I was pretty excited to have an excuse to go. Here are a few photos from when my Mama and I drove over to check it out:
 The shop is in a cute little brick building that sits across from the railroad tracks. It has a very casual, calm atmosphere and they have quite an extensive tea menu. I ordered Yerba Mate, an herbal tea from Latin America, which I'd never tasted hot. My mum got her favorite black tea and we sat, talking for over an hour, enjoying our snacks.
 I love getting one-on-one time with my mom and making new memories with her. She knows me well and has so much wisdom that I sorely need. I'm so thankful for her and her influence in my life. (I'm also thankful that she doesn't mind me sleeping over when my man goes out of town and watches Jane Austen movies with me xo)
 It was fun to go on a mini day-date with my mom. Mama time + a tea party makes for a pretty successful day!
Steph xoxo
It was fun to go on a mini day-date with my mom. Mama time + a tea party makes for a pretty successful day!
Steph xoxo

 |
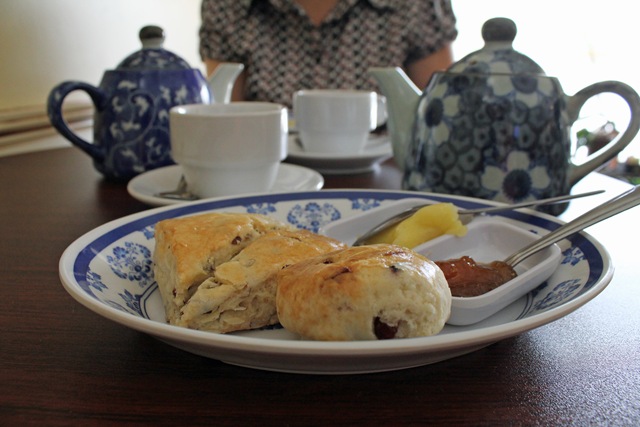
| Almond scones, jam, and lemon curd |
 |
| Yerba Mate & Peach Black Tea |
The shop is in a cute little brick building that sits across from the railroad tracks. It has a very casual, calm atmosphere and they have quite an extensive tea menu. I ordered Yerba Mate, an herbal tea from Latin America, which I'd never tasted hot. My mum got her favorite black tea and we sat, talking for over an hour, enjoying our snacks.
 I love getting one-on-one time with my mom and making new memories with her. She knows me well and has so much wisdom that I sorely need. I'm so thankful for her and her influence in my life. (I'm also thankful that she doesn't mind me sleeping over when my man goes out of town and watches Jane Austen movies with me xo)
Recently, I read this post from Teaspoons & Petals about a marshmallow tea latte. Say what?! Marshmallows in your tea? I was intrigued and, since I've been looking for a reason to make homemade marshmallows, I decided to try it.

Making the marshmallows was super easy and they turned out pretty well. They taste great and were perfectly frothy in the tea! I'll definitely be pulling the recipe out again once hot cocoa season returns.

I wanted to experiment with the marshmallows in hot tea so I stuck to making the tea with water instead of milk. Once it was finished steeping, I added the marshmallows, which quickly melted, forming a perfect layer of yummy foam on top. In an attempt to make the drink more latte-esque, I added four marshmallows, which ended up making the tea almost unbearably sweet. That said, I really liked the drink overall. It was a sweet way to switch up my tea routine and the added marshmallows gave it the same homey feeling as hot cocoa. I'm excited about having this again once winter returns!

Happy Friday!
Steph xo

A few weeks ago, a friend of mine introduced me to Thai Iced Tea and, I have to admit, I'm a little bit obsessed with it. Since it has recently been rather toasty in Atlanta, this has been the perfect afternoon refreshment and the added tapioca pearls make it more like a yummy snack than a drink! All of the ingredients for this recipe can be found at online or at your local Asian market for less than ten bucks and come with enough ingredients to make it several times over. While there are several variation of this drink, here's how I like to make mine:
Iced Thai Bubble Tea
Makes 2 servings
3 cups water
2/3 cup Thai tea leaves
1/3 cup tapioca pearls
5 tbsp sugar
half and half
1. In a small pot on the stove, heat the 3 cups of water until boiling. Remove from heat and add the tea leaves. Stir to wet all of the tea and let steep for 4-5 min.
Tip: If your tap water tastes a bit strange, like mine, make sure you filter the water or use bottled water so that the tea doesn't taste strange, too!
2. Once it has finished steeping, pour the tea through a fine strainer to remove tea leaves.
Tip: The orange dye in some Thai teas stains so be careful when pouring!
3. Add sugar while tea is still hot and stir until fully dissolved.
4. Let tea cool to room temperature, then put in the fridge to cool.


5. In a separate pot, prepare the bubbles (tapioca pearls) as directed.
Tip: Although the packaging on the bubbles that I used read 'Ready in 5 min', I found that I still needed to boil them for ten to fifteen minutes for them to get squishy enough.


6. Spoon finished bubbles into prepared glasses. Add ice.
Tip: To prevent the ice cubes from watering the drink down, I made ice cubes out of the tea beforehand.
7. Add cooled tea to the glass, leaving an inch or two at the top, depending on how much half and half you're adding.
8. Pouring slowly, top the tea off with half and half. The milk and tea should separate into two distinct layers.
Tip: You must include the ice in order for the distinct layers to form.
9. Add the straw and sip away! Drink with the layers intact or mixed.

